

HAM DinMeter3P
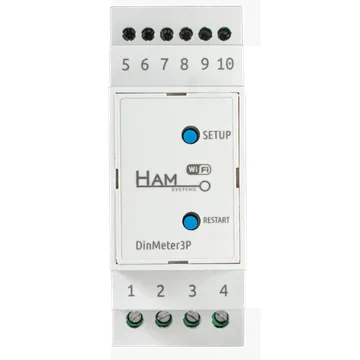
The HAM DinMeter3P measures the energy of a three-phase supply, per phase and in total. You install it on a DIN rail in the electrical panel. It measures current with three current transformers (CTs).
The serial number starts with e9:.
What it measures
Section titled “What it measures”| Reading | Unit | Note |
|---|---|---|
| Voltage [A], [B], [C] and Voltage | V | Phase voltage per phase. |
| Voltage [A-B], [B-C], [C-A] | V | Line voltage. Calculated by the platform. |
| Current [A], [B], [C] and Current | A | From the CTs. |
| Power per phase and total | W | |
| React. Power per phase and total | VAR | |
| Appar. Power | VA | Calculated by the platform. |
| Power Factor per phase and total | ||
| Energy per phase and total | kWh | |
| Energy 2 | kWh | Second counter, for an alternate tariff, for example a night tariff. |
| THD Voltage (A), (B), (C) | % | Total harmonic distortion of voltage. |
| THD Current (A), (B), (C) | % | Total harmonic distortion of current. |
| Frequency | Hz | |
| Voltage Imbalance | % | Calculated by the platform. |
| Cost (approx) | From the Cost per kWh setting. | |
| CO₂ Emissions | ton | Calculated from energy. |
| Energy (Daily), (Weekly), (Monthly) | kWh | Energy per period. |
The device has no outputs. It only measures.
Typical uses
Section titled “Typical uses”- Consumption metering of a three-phase supply in a shop, office or factory.
- Power quality checks, with THD, voltage imbalance and power factor.
- Energy cost allocation per area or per panel.
Installation
Section titled “Installation”The device gets its power from the panel. Install it on a DIN rail.
Match the CTs to the phases
Section titled “Match the CTs to the phases”Each CT must measure the phase that connects to the matching lower terminal:
| CT | Upper terminals | Phase | Lower terminal |
|---|---|---|---|
| CT1 | 9 and 10 | L1 | 3 |
| CT2 | 7 and 8 | L2 | 2 |
| CT3 | 5 and 6 | L3 | 1 |
If a CT measures a different phase, the power and power factor of that phase are wrong.
CT polarity
Section titled “CT polarity”- On each terminal pair, put the white wire on the left and the black wire on the right.
- Close each CT around the conductor of its phase.
- Turn side K (or S1) toward the supply and side L (or S2) toward the load.
If you cannot turn a CT, swap its wires. Put the white wire on the right and the black wire on the left.
Check the installation
Section titled “Check the installation”The app checks the angle of each phase when the power of that phase is 1000 W or more. If it finds a problem, it shows a warning icon next to the device name. Tap it to see the message.
- Phase … CT is probably reversed, consider switching polarity: the CT of that phase is reversed. Turn the CT or swap its wires.
- Phase CTs probably do not match: a CT measures a different phase. Check the matching table above.
These warnings show an installation error. They do not show a device fault.
Connect to WiFi
Section titled “Connect to WiFi”You connect the device from the mobile app. Select HAM DinMeter3P in the list.
- Press and hold the SETUP button for a few seconds.
- Release the button when the green LED starts to blink.
- Continue with the steps in Connect to WiFi.
When the device is connected, the green LED stays on. See LED states.
Terminals and protection
Section titled “Terminals and protection”- Bottom terminals: 1 (L3), 2 (L2), 3 (L1), 4 (N).
- The device gets its power from phase L1 and neutral.
- Use only the CTs that came with the meter. The secondary current of the CT must not be more than 150 mA.
- The device has no overload or short-circuit protection. Install an overload protection device in the panel for its power supply.
- Install it in a panel that normal users cannot open.
The device has a SETUP button for the WiFi connection and a restart button. The red LED stays on when the device is connected to WiFi. The green LED stays on when it is connected to the cloud. If the red LED is on and the green LED is off, the router or a firewall blocks the connection.
Settings
Section titled “Settings”- Cost per kWh, Cost per kWh (alternate metering): the energy price. See Energy use and cost.
- Do not keep track of data: the platform keeps no reading history for the device.
- Disable manual control: local control with the device buttons is disabled.
- Allow LAN commands: other devices on your local network can control this device. Keep the setting off if you do not need it.
- Force IPv4: the device uses only IPv4 connections. It is on by default.
General settings for all devices are in Device settings.
Troubleshooting
Section titled “Troubleshooting”- Warning icon next to the name: see the section “Check the installation” above.
- The power of one phase is negative: the CT of that phase is reversed.
- The power of one phase is 0 with a load connected: the CT is not closed around the conductor or is not connected.
See also Wrong values and Device offline.
Specifications
Section titled “Specifications”| Mounting | DIN rail |
| Power supply | 230 VAC from phase L1 and neutral |
| CTs | 3, one per phase. Primary 80, 120, 150, 300 or 450 A, secondary up to 150 mA. HAM calibrates them with the meter. |
| Outputs | None |
| Connectivity | WiFi 2.4 GHz |
| Measuring input | 3 x 230 VAC (3P4W), 50 Hz |
| Accuracy | ±4% |
| Operating temperature | -10 to 50 °C |
| Dimensions | 2 DIN modules, width 35 mm |
| Material | ABS UL 94 V-0 |
To buy, see the shop.